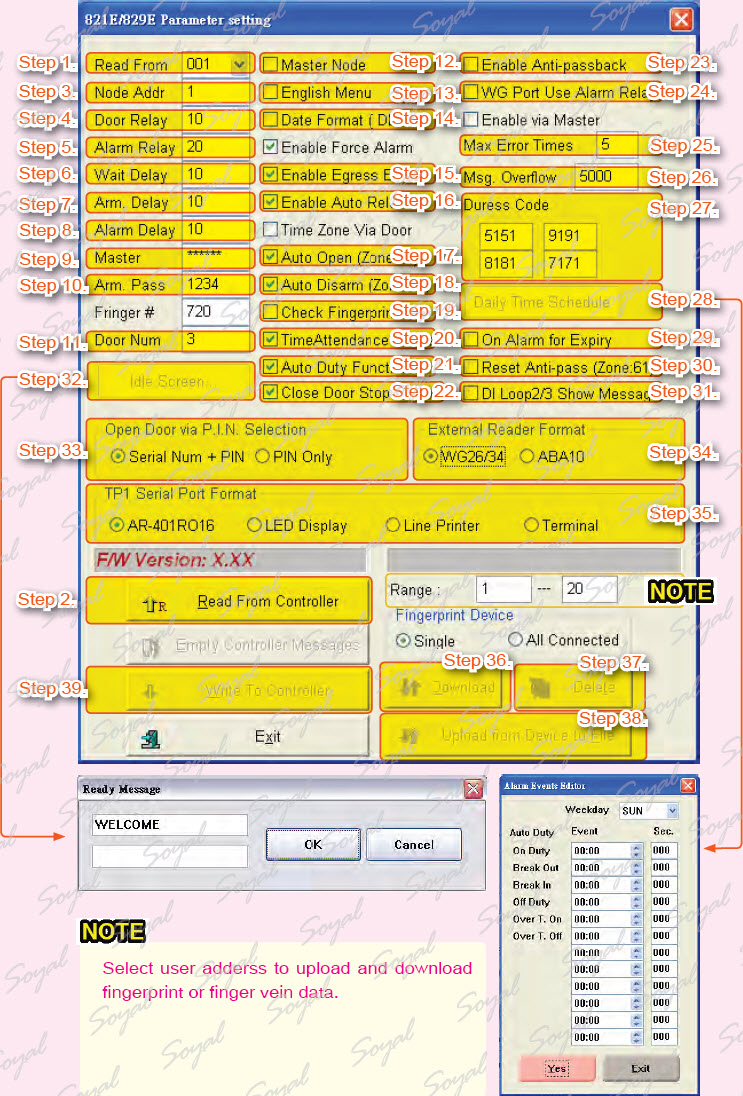
821E/829E Parameter
8 series access controller is an advanced access controller , most of the parameters need to set via 701Server.
Click ![]() to open 821E/829E Parameter setting window.
to open 821E/829E Parameter setting window.
Step 1. AR-829E is with LCD panel access controller, enter program mode and input 31 (quick instructions) to set node ID. Setting AR-829E node ID is 001.
Step 2. Press “Read From Controller” to receive access controller data.
Step 3. Modify the access controller node ID.
Step 4. Lock relay time: lock relay time is the amount of time that the lock will be operated.
Step 5. Alarm Relay Time: alarm relay time alarm continuous transmitter time.
Step 6. Lock Relay Time + Door Open Time.
Step 7. Arming Delay Time: the time between arming mode preapred and arming mode actived, it is buffer time.
Step 8. Alarm Delay Time: abnormality occurs and alarm delay time expires, the alarm will be issued. The main objective is to reduce false triggering.
Step 9. Master Code: the master code is used to access all the programming features (6-digits).
Step 10.Arming PWD:if the controller is in arming mode , they can always detect whether there are anomalies and alerts. There are two ways to set arming mode: 1. Enter program mode 2. Input arming PWD.
Step 11.Door Number: the number corresponds to location to help user identify access record and area.
Step 12.Master Controller of Network: if there are many networking access controllers, you must set one controller as Master Node.
Step 13. English Menu: Change to English interface, this feature could be also set in the controller.
Step 14.Force Open Alarm Output :The alarm will be activated when someone tries to open the door abnormally.
Step 15.Request To Exit: through RTE to open the door
Step 16.Auto Re-lock: If the door close then the door lock will relock, using door contact to detect the status of door.
Step 17.Auto Open (Zone: 63): 701Clien zone63 for auto open time (refer to![]() ).
).
Step 18.Auto Enable Arming Mode (Zone: 62): 701Clien zone62 for auto arming (refer to ![]() ).
).
Step 19.Check Fingerprint: if access controller is AR-821EV, it has a fingerprint recognition
function.
Step 20. Time Attendance Reader: integration of the access record of access controller’s memory for the attendance report.
Step 21.Auto Duty Functions: access controller LED will display “Duty: 0, Duty: F; OVT: 0, OVT: F” message.
Step 22.Close Door Stop Alarm: The activated alarm will be stopped when the door is closed.
Step 23.Enable Anti-Pass Back: when two readers are used to control Entrance/Exit,anti-pass back may be set.
Step 24.WG Port Use Alarm Relay: external WG reader to control dual doors. Must Use alarm output as Wiegand reader output.
Step 25. Max Error Times: determine the allowable number of input errors, if the number of input errors exceeds this max error times, keyboard panel will be locked (if max erro time is 0, this function will be disabled).
Step 26.Msg. Overflow: The access controller will save the data temporary during offline. There will be alarmed if the capacity of data exceeds Msg. Overflow and remind administrator to save the data into the computer.
Step 27.Duress Code: if you meet abnormal person to threaten open the door, you can input duress code and send message to control center.
Step 28.Daily Time Schedule: there is a time-scheduled output of AR-716E for using, setting relay output, specify the weekday, time. General be used in office and auto management.
Step 29.On Alarm for Expiry: if The alarm will be activated if someone presents invalid card to the reader.
Step 30.Reset Anti-pass (Zone: 61): zone 61 be used in reset when the user violations and emergencies, reset function of anti-pass back.
Step 31.DI Loop 2/3 Show Message: if AR-829E DI is received signal can according to the demand this signal displayed on the computer screen.
Step 32.Idle Screen: enter message in idle screen, this message will be displayed on access controller LCD panel.
Step 33.Open Door via P.I.N. Selection: select access mode. Serial Num + PIN: input user address and private PIN and press # PIN Only: Input private PIN directly (there are no control mode inAR-829E).
Step 34.External Reader Format: select external reader format.
Step 35.TP1 Serial Port Format: select external equipment.
Step 36.Download: download fingerprint data to access controller (select user adderss to be download).
Step 37.Delete: delete AR-821EF/V’s fingerprint or finger vein data (select user adderss to be deleted).
Step 38.Upload from Device to File: saving fingerprint or finger vein data from access controller to the computer (select user adderss to be uploaded).
Step 39.Write To Controller: Write all settings to access controller.
Note
Select user adderss to upload and download fingerprint or finger vein data.
| ย้อนกลับ | กลับสู่เมนูหลัก | ถัดไป |
