| 2.1.2 |
Upload and Download Data |
|
This is data exchanging windows for between the management software and Device. The exchanging windows utility is used to download or upload recorded data and the user’s information. The following procedures demonstrate how to use the windows utility to download and upload data. Before come to operation, connect the device first. |
|
Download Attendance log from Device: Download all records which have pass verification from the Device; |
|
Download user info and FP from Device: Download user information, the employee’s fingerprint can be download at same time |
|
Upload user info and FP to Device; upload the user information and fingerprint together at same time. |
|
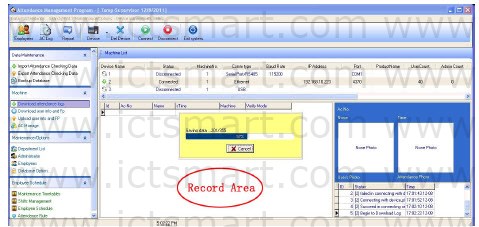
1. Download attendance log from Device: It is unable to download data from the Device unless the system and the Device are at the connection condition. Directly click on “Device Machine” in the main interface right side to download data record from the Device Or enter management menu, chooses data to be download from the Device. |
|
 |
|
The system could prompt “Saving datas“, by now please wait for moment, after the completion of data downloaded, the prompts will appear in the right side of table below, informing you that the to download data was successfully, the communication between the Device and the software already has disconnected. The downloaded data should be added to the system, if data is too bigger, it is possible need to take much more time. |
|
The downloading record can completely display in the circle record region like as above figure. At the same time, the new data record will be stored in the employee’s record data list in the system, you will be allowed to view it from the attendance record; the new user will be stored in the employee information table of the system, it is allowed to view through the employee’s maintenance. After downloading data, the system still cannot automatically clear data which is stored up in Device. under this option> Maintenance/Options> Downloads record> you choose item as that download the record and delete the record data on the Device together at same time, system can automatically remove data record from Device |
|
2. Download the user information from the Device |
|
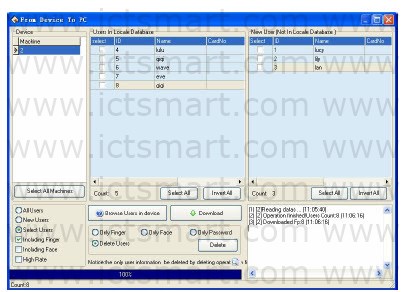
Only when the system and the Device are at the connection condition, the downloading data is available, directly click on “Machine” the main interface left side, the column Download user info and Fp, access Device management menu, choose download the personnel information from the Device |
|
View user on the Device: Click on “Browse Users in Device” button. For new users, it will display in the “New User” column. Meanwhile, it will suggest new users added to the system database. |
|
Download: When the data has to directly download, click the button to downloads |
|
If there is a new user in “New User” the column, it will prompt whether add the new user to the system database. If user on the Device were a user which already existed in the system database, then these users could display in “there is a user in the local database” column. |
|
 |
|
Highspeed download: When the device was connected with Ethernet, and the data is rather much, you can use the high-speed download function to increase the transmission speed (if you use the ZKFinger10.0 and facial recognition algorithms equipment, this function is unavailable). |
|
Delete: Choose user who want to be canceled from the list area, also can choose all users. Delete fingerprint, face, or password only, just need to put the tick in front of the corresponding item, then click “Delete” button, if want to select many item record, may hold down “Ctrl” key and click with mouse at same time. |
|
3. Upload user info and FP to device |
|
When it was careless of user to cancel personnel information or many Device are in use together at same time, for convenient use, reduce the enrolling work, the software provide to upload personnel information from the database to machine. |
|
The upload data operation is unable to execute till system and Device is in connection status. Directly click upload personnel information to device in the “Related Device Operation” column, or enter Device management menu, select upload personnel information to Device. |
|
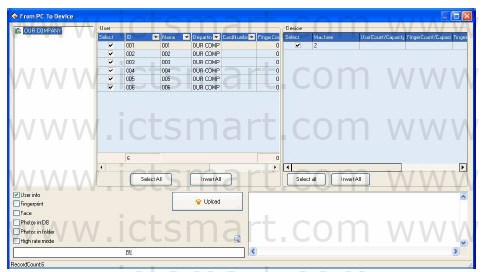
Select employee by department: E.g. there are mare many departments in a company, if some employees of the department need to be uploaded, you can click this department with mouse, the all employee in this department will display in the list. Shown as following figure |
|
 |
|
Upload |
|
1) Select the employees which need to upload on the employee list. Click “Select all” button, select all employees; select “Invert All” button unselect all employees. |
|
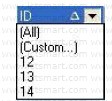
Click button on the employee list’s column name; can screen information which display on the employee list. For example, clickbutton on the ID Column, the following list wills popup: button on the employee list’s column name; can screen information which display on the employee list. For example, clickbutton on the ID Column, the following list wills popup: |
|
 |
|
A. Click the id on the list to select, and then only display the selected employee’s information on the employee list. |
|
B. Click “All” to select all employees, and then display all employees’ information on the employee list. |
|
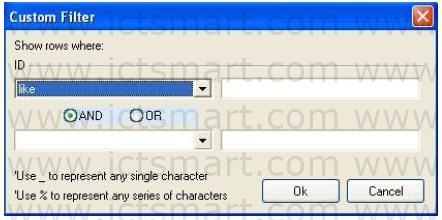
C. Click “Custom”, the following window will popup: |
|
 |
|
Click button under ID, select search field on the dropdown list, and then input value in the box. Click single select box  , chose the custom condition as And or OR. After setting, click “OK” button to save, and then return Upload window, the window in the employee list will display a custom filter is set in the condition corresponding to the user information. , chose the custom condition as And or OR. After setting, click “OK” button to save, and then return Upload window, the window in the employee list will display a custom filter is set in the condition corresponding to the user information. |
|
2) Select machine on the Device list on the right of window. User info/Fingerprint/Face/Photos: Select the information need to upload. |
|
Upload in High Speed: When if these machine hookup by Ethernet, and have large quantity of data to upload (if you use the ZKFinger10.0 and facial recognition algorithms equipment, this function is unavailable). |
|
Delete: Choose this user which want to be canceled, and then choose “Cancel” button. |
|
Note: Please check the Finer Version (9.0 or 10.0), Must ensure that the upload fingerprint type same with the device fingerprint version, otherwise unable to successfully uploaded employee information. |
|
3). After complete setting, click “Upload” button to start. It will display the upload process at the button of the window, and show the operation records in the list. Show as below: |
|
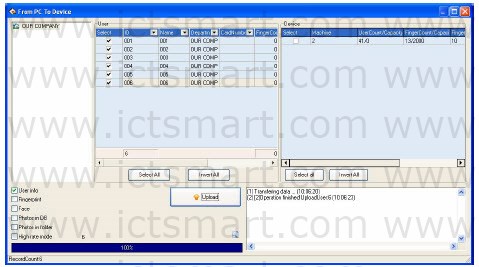 |